Who: this post is for anyone looking to learn some of the foundations required for working with Node
What: this post will show you how to create a simple resource server using vanilla Node and the Node http module
How: the magic of a simple request handler, also known as a router
When: anytime you want
Why: to serve a client request with any resource (file, database entry, etc.)
Node
Node is the tool that we will be using to build our server, so what is Node?
In essence, Node is just a JavaScript interpreter, packaged with a bunch of helper libraries and a command line interface tool.
Summary of Node:
- Node is a JavaScript interpreter built on the V8 engine that powered the Google Chrome browser
- Node is packaged with a bunch of utility libraries for performing common development tasks, like interacting with a file system or sending an HTTP request
- Node is packaged with a command line interface that allows you to enter
nodeand then either enter the Node REPL or provide a file for Node to execute - Node isn’t much more than that
- Node doesn’t have to be used ‘on the server,’ as is oft-misstated — you could build a command line app with Node just like you could with Ruby, without using Node ‘on the server’.
Now that we have an idea of what Node is, let’s talk about the theory behind what we are building. We are building a server that responds to request from a client. So, what is a client, request, response, and server?
Client / Server Model
This model just describes a relationship between entities, the clients and the servers. In this model, there is a relationship between clients and a server, where that relationship involves the server providing a service to clients. Here is a fun analogy:
Imagine that there are no ovens or microwaves in the city in which I live, other than the single microwave that I own. I have decided to provide a service to my fellow city inhabitants.
One by one, my neighbors, my dear clients, walk up to my front lawn — I have positioned my microwave on top of a card table, and connected the microwave via an extension cord plugged in to the garage outlet.
Each client, who wants to use my service, places her food on my table, hands me $0.25, and tells me a number (the number of seconds to heat the food in the microwave).
The relationship that I have to the neighbor I serve, is one of a server to a client — this the ‘client / server model’ that people talk about. This is one of many distributed communication models, but discussing those models would take us too far afield.
So, you might be thinking, how will our server get requests, and how will it serve the responses back to the clients? Good question. On the web, this client / server model is enabled by HTTP network communication. So, let’s talk about HTTP, real quickly.
HTTP
HTTP is a protocol that, when followed correctly, allows computers in different locations to communicate ‘across the wire’ of the Internet. If you use a web browser, every page that you see is served by HTTP communication (partially).
For our purposes, all you need to know are the following concepts:
- HTTP supports various request types:
GET,POST,PUT,DELETE,OPTIONS, etc. — these verbs specify what to do with the resource being requested - HTTP communication usually involves a request from a client and a response from a server — the request contains at least headers (metadata about the request), and a body (the data of that the request is meant to send). The response contains at least headers, a body, and a status code to tell the client if the server could handle the request or not.
Enough theory, I think we are ready to jump into the file structure of our application.
App Structure
package.jsonis an app manifest for use with NPM modules — the specification of dependecies is the important part of this file..gitignorehas the usual list of files and directories to ignore — if you don’t have one setup already, google ‘.gitignore for node dev [insert operating system]’server/server.jsdeclares the ip of the server and request entry port, then the server is created with the input of a routine that will handle requests — the request handler routine is our magic doorman, the router. Then, the server is told to listen for requests to the given ip and port.server/router.jswill handle different types of requests by mapping request features onto pieces of code that should be run in response to that given pattern.server/http-helpers.jsdeclares helper functions for communicating over HTTP, since our server will be handling HTTP requests only.public/contains all static assetstest/contains tests for your application
If the interactions between the different parts of this app structure are hazy in your mind, don’t worry — we are turning to that now.
High-Level App Overview
Here is a diagram of the app flow, which I will explain below. The black dot at the top of the diagram represents the entry point to our server program — in our case, server/server.js, as declared in our package.json file.
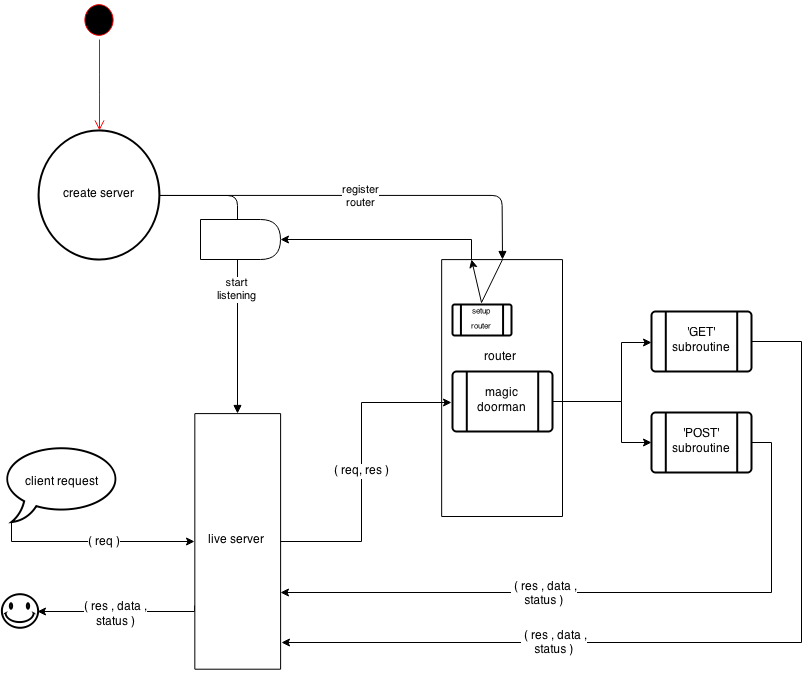
- The server program entry point,
server/server.js, will create a server and register a router- the registration of the router will trigger the router to set itself up
- when the router setup is complete, the server will start listening for requests, i.e., you have a live server
- Now that the server is listening for requests to a given address and on a given port, the client can service incoming requests from clients — let’s assume our service can either serve up a resource or create a new resource (HTTP GET and POST requests)
- e.g., the client issues a request to the server
- the server creates a skeleton response object and sends it along with the request object to the router (the magic doorman)
- the router will run some type of process to filter the requests based on their different properties
- in our case, the router will check the HTTP request method, and route to the correct routines — our skeleton will start by only routing
GETandPOSTrequests - the router will send the request and response objects to the correct routine (either the ‘GET’ subroutine or the ‘POST’ subroutine in our example)
- in our case, the router will check the HTTP request method, and route to the correct routines — our skeleton will start by only routing
- the subroutine will do some work on the request and response objects
- finally, the subroutine will send the response, optional data, and a status code directly back to the server
- The server receives the response, optional data, and status code from the subroutine
- the server sends the response, data, and status code back to the client who initiatied the request
- The client receives the response, data, and status code from the server — and is sometimes happy
Now that we have a good mental-model of the top-level flow of our application, let’s look at the code that implements this outline.
Code
package.json
Remember, this file just declares your app’s dependecies for NPM use.
This file is pretty self-explanatory, but I will describe it for completeness:
- names your app if you register it in the NPM registry
- declares a version number
- declares the main entry point for the program
- declares the author of the application
- states the app license
- declares all dependencies and development dependencies
- defines the custom scripts that npm can run for your app
.gitignore
Whatever standard .gitignore you usually use for your setup with Node apps.
public/
Whatever public assets that you want to serve — index page for your root route, stylesheets, etc.
test/
Whatever testing framework you want to use — I tend to like mocha (or jasmine), plus the chai expectation library. Also, sinon is a big help for certain types of testing.
server/server.js
Here is the entry point for your Node application, which I will explain below:
- require the Node
httpmodule - require your
routermodule - define your the port on which your server will be listening
- define your server ip address
- create your HTTP server
- pass your server the router’s request handler function, for handling requests
- log out some server info
- tell the server to start listening on your port and ip address
When our server is created, it registers a request handler to which the server will delegate the request handling. If you are curious about how that delegation is happening, check out the Node docs for http.createServer. Let’s go look at that request handler now!
server/router.js
The majority of our service’s work will be done in this file. Our handleRequest method has been delegated the responsibility of handling the requests that the server passes to this router. Let’s see how the handleRequest method routes requests to the code that should be run to serve the given requests.
Here is the skeleton code, and then I will go through line-by-line.
We start by requiring the Node path and url modules, though this is optional — I usually need both modules within my router.
Next, we require the server/http-helpers module, which we will discuss below. We are saving this module as utils because the module contains a bunch of utilities that we wrote for interacting with HTTP requests and responses.
Starting on line 5, we will define our route handlers based on the type of incoming request method; the route handlers will be stored as properties on our actions object.
All of our route handler methods must adhere to a certain interface — request handler method signatures must at least include a request and response so that the handlers can easily access the delegated requests and responses passed from the server.
We are going to skip down to the actual router, handleRequest, before we examine the contents of the 'GET' and 'POST' request handler subroutines. Remember that our server is delegating the handling of all incoming requests to the handleRequest method — i.e., handleRequest is the router that will map the requests onto the correct subroutines to run in response to given requests.
handleRequest
- line 31: takes a request and a response as an input from the server
- line 32: looks into the actions object for a subroutine that can handle the given request
- in our case, the subroutines are indexed based on the request method name (e.g.,
'GET','POST', etc.)
- in our case, the subroutines are indexed based on the request method name (e.g.,
- line 33: if there is no subroutine defined to handle the given request method, we use a utility to send a 404 response back to the server; if there is a subroutine defined to handle the given request method, invoke that subroutine with the request and response objects
'GET' – example GET request handler
This is just a skeleton request handler subroutine — to fill out this skeleton, one needs to know the purpose of the API to which the request is being issued. So, let’s talk at a level of abstraction a little higher than the implementation level.
Usually, a GET request to an API is interpreted as the following: the requesting client wants the API to send back the data pertaining to the resource at the given request endpoint (i.e., the part of the request that tells the server which resource is desired). In HTTP-land, the endpoint for a request usually corresponds to part of a URL — usually some part of the path — e.g., /users/3iEadf8fj625/tweets/, /index.html, etc.
The server needs to take that endpoint and read it for patterns — if the router recognizes a pattern that has a registered subroutine, then the router will delegate the request handling to said subroutine. In our diagram above, the endpoint-filtering, pattern recognition, and subroutine mapping is taken care of within the ‘magic doorman’ box.
In our code above, on lines 7 through 10, there are comments with an example of how one might filter endpoints in HTTP-land. The example comments just use the Node url module’s parse method to parse the url property of the request object. Then, the endpoint will be available as the pathname property on the parsed url.
Usually, once the handler has a usable endpoint, the handler is expected to get the resource represented by the endpoint from wherever it is stored — hence the name of the HTTP request method, GET. Depending on the setup and purpose, the resource might be stored a number of differnt types of persistent stores (file system, database, etc.).
Let’s assume that your resource is stored in a database. At this point in your request handler, you might query the database for the resource. The query will return one of two things: an error or the data of the requested resource. If the database query returns an error, handle it according to your desired app logic. If your database returns the resource data, put the data into the correct format, and use the HTTP utility that we are going to write to respond to the server with the correct response, properly formatted resource data, and a status code of the operation. BOOM.
'POST' – example POST request handler
This is also a skeleton request handler subroutine — this subroutine will handle incoming POST requests to the API. Usually, this is interpreted as the following: requesting client wants the API to create a resource with the information that the client is sending — kind of like the client is saying, ‘hey bro, make this and save it for me. I might want to get it back from you later. Thanks’.
The client is sending along some data with the POST request — data that will be used to create a resource in the database. So, the first thing that our subroutine has to do to handle the POST request is collect and prepare the data from the request object into the correct format for storage in the database. We are going to use one of our utility HTTP helper methods called prepareResponse to collect and prepare the data. This utility will also take a callback, which it will trigger once it has completed preparing the data. That callback will have access to the prepared data.
At that point, within the callback, the handler can do whatever it wants with the data — pass it through some middleware, validate it, save it to the database, transform it, etc. — and then send back a response to the server that indicates the success of the whole operation. Usually, the post request will be redirected on success or sent an error on failure. In our code, we are using a utility method called redirector, which we will implement below. The redirector will send a redirect response back to the server. BOOM.
Now that our GET and POST request handler subroutines are finished, we could add different types of request handlers to our router’s actions object, so that we could handle more than the current GET and POST requests.
We have finished our router, but the router implementation relied heavily on the utility helpers that we haven’t discussed yet. Let’s turn to the HTTP utilities now.
server/http-helpers.js
At a high-level, this module just provides a bunch of utilities for working with HTTP requests and responses in Node. I will explain the code below.
- lines 1 – 7: sets up a reusable object with default response headers
- these are particularly helpful for doing CORS work
- line 6 allows you to set the content type of the request, which is set to JSON in our example
- lines 9 – 13: utility for preparing responses to
POSTrequests- the function takes a request object and a callback as parameters
- line 10: create empty string and store in
datavariable - line 11: listen on the request’s
'data'event (when the request object, which is a Nodereadable stream, finishes streaming a single chunk of data, the'data'event fires, meaning that the event will fire repeatedly until all the request data is read)- each chunk of data is concatenated to our
datastring that we declared and initialized in closure
- each chunk of data is concatenated to our
- line 12: listen on the request’s
'end'event (when all of the stream data has been read, the request fires an'end'event, signifying that all the request data has been transfered)- when the
'end'event is emitted, we invoke the callback with the fully-read data so that the callback function has access to the data
- when the
ASIDE
When we used the prepareResponse utility in our request handler subroutine, we gave the utility a callback that would take the data and do something with it (e.g., save it to the database). That is what we are doing by invoking the callback with the data in prepareResponse — we are passing control back to the callback in the request handler subroutine, and we are giving that callback access to the data that was read. This is the heart of Node.
Always perform blocking I/O asynchronously
What does that mean?
- Node is a JavaScript interpreter, first and foremost
- Node is ‘single-threaded’, meaning that it can only process one line of code at a time (no concurrent processing)
- Because of 1 and 2 above, it is possible to ‘block’ your Node app’s processing
- Most input and output operations (I/O) are time complex and costly, so they can be considered ‘blocking’ — e.g., writing to a database, reading from a file on your harddrive, etc. — because they don’t get to exploit the speed of in-memory operations
- A blocked thread is annoying if your Node app is serving users who have to wait until the blocking operation finishes before they can even request new operations
- You can avoid blocking your Node thread by performing those costly operations asynchronously
This is the heart of Node (2).
When a request for a costly operation comes in, package up that request with a callback that specifies what to do when the costly operation finishes processing and fire off that request. But, do not wait for the result of the costly operation to come back before processing the next piece of code. Instead, continue processing the next piece of code, and when the costly operation finishes, that operation is responsible for triggering the callback and passing it the correct data. The callback will then inject itself back into the main thread and perform the desired operation with the data it needed from the costly operation.
All of the above can be summed up as follows: when working with Node, if in doubt, pass it a callback™
END ASIDE
Now that we have a firmer appreciation for why Node apps can be fast (if implemented well), we can move on to analyzing the other utilities.
- lines 15 – 19: utility for sending a response back to the server
- this function is responsible for sending a response back to the server, by writing the headers of the response and ending the response (passing in the data for the response)
- this function can be invoked with a response (to send), some data (to send), and a status code (to send)
- line 16: set a default status code if one isn’t provided
- line 17: write the response headers with the headers that we defined at the top of our file
- line 18: end the response, which is a Node
writable stream, with the data you want to write to the response — this is equivalent to writing a bunch of data to the response, then closing the write stream
- lines 21 – 23: utility for sending an error response back to the server
- this function is invoked with a response object, which will send a 404 response code and error message back to the server by tacking it onto the response object that was passed in
- line 22: use the helper we wrote above to
respondto the server — however, tellrespondto send the response object back with a ‘Not Found’ message and a 404 status code
- lines 25 – 29: utility for sending a redirect response back to the server
- this function is used to redirect the request and response to a new location, i.e., to a new endpoint (a web address in HTTP-land)
- this function takes the response object to pass along with the redirect, as well as an optional status code and location (address) to use as the redirect final destination
- line 26: set a default status code if one isn’t provided (302 is temporary redirect)
- line 27: write the headers on the response object with the status code and an object that contains a
Locationproperty, set to your final destinationLocationhooks into the browser APIs and directs the browser to request the resource at the given location
- line 28: end the response without passing data, since the redirect status code and final destination are all that is needed to satisfy the client’s request
That is it for our HTTP utility functions, and our application skeleton! Let’s summarize.
Summary
- Node Fundamentals:
- don’t block the JavaScript interpreter’s loop
- I/O is costly, do it asynchronously
- provide a callback to handle results of asynchronous I/O operations
- Client < – > Server Model:
- client requests a service
- server serves the client’s requests
- Node HTTP Server:
- create server and delegate all request handling to a router
- then, tell teh server to listen for incoming requests at a given address and on a given port
- Router:
- filter incoming requests based on patterns
- map the requests to their registered subroutines
- Request Handler Subroutines:
- receive a request and response from the router
- do stuff with the request and write stuff to the response
- send the response back with a status code to the server, which will send it along to the appropriate client
BOOM.